Multiple Descriptions Sample
This demo shows how to create a custom upload pane using the Thumbnail control and how to upload additional information along with each file.
Features
The application highlights the following features:
- Working with the upload list items via JavaScript.
- Use of the Thumbnail class.
- Appearance customization, including custom upload pane and HTML buttons.
- Upload of additional data.
To find information about how this demo is implemented using a specific platform, see the Samples by Platforms topic.
Client-Side Code
Appearance Customization
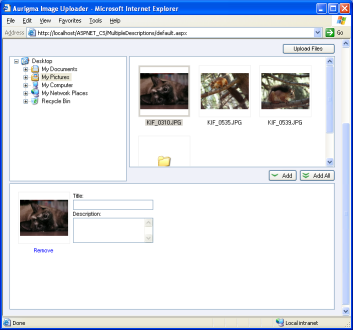
Figure 1. Application appearance of the ActiveX version.
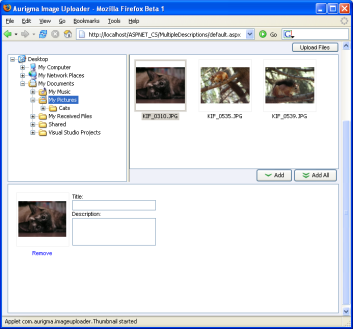
Figure 2. Application appearance of the Java version.
The main goal of this sample is to demonstrate how to create a custom upload pane. To add such a pane to your page, do the following:
- Hide the standard upload pane, setting the FolderPaneHeight
property to
-1. This way the folder pane becomes the height of the tree pane. - Add the DIV element that will represent the upload pane on your page and contain custom thumbnails.
- Add the functions to work with the upload list items. For details about implementing them, see the Working With the Upload List Items via JavaScript subtopic below.
For more information about creating custom upload panes, see the Customizing Upload Pane topic.
In order to replace standard buttons with custom HTML versions, the standard ones are hidden using the ShowButtons property. Then, appropriate Image Uploader methods are bound to the new buttons via their onclick handlers. For more details, see the Customizing Buttons topic.
Working With the Upload List Items via JavaScript
In this sample, additional controls are displayed when the user adds images to the upload list. To display that kind of data, properties of items in the upload list are accessed via JavaScript. And for that several ImageUploader class members are used:
- The UploadFileCountChange event handler is used to determine, whether files are removed from the upload list or added into it. If so, updates the upload pane (thumbnails, titles, and descriptions).
- The UploadFileCount property is used to retrieve the current number of items in the upload pane.
- The UploadFileGuid property is used to get the file unique identifier (GUID). Such identifiers are used to display thumbnails for images and link additional data to images.
- The UploadFileRemove() method is used to remove the corresponding item from the upload list when the user clicks the Remove link.
In short, the following algorithm is used to create a custom upload pane:
- Register a handler for the UploadFileCountChange event.
- Make this event handler to compare the current file count with the previous one.
- If files are added, the handler should display a new thumbnail (i.e. create the Thumbnail control and add it to the upload pane) with description and title fields.
- If files are removed, the handler should remove appropriate Thumbnail controls and additional data fields (description and title) from the upload pane.
GUIDs are used to access items in the upload list. But using them to search items directly would make the application work too slow. Instead, a hash table is used to map GUIDs and indices in the upload list. This way the search operation becomes extremely fast.
Thumbnail Class
The Thumbnail class is used here to display thumbnails of images in the upload list. The Guid property of this class is used to link each thumbnail with an appropriate element of the upload list. And the ParentControlName property links the thumbnail with the main Image Uploader control.
You can read more about the Thumbnail class usage in the Customizing Upload Pane topic.
Upload of Additional Data
In this sample, descriptions are sent as built-in Description_N POST fields, and titles are sent as
additional POST fields. The BeforeUpload event handler is
used to set both these fields:
- Use the UploadFileDescription property to set the
Descriptionfield. - Use the AddField() method to add titles.
There are other ways to send extra data using Image Uploader, and they are described in the Uploading Additional Data with Files topic.
Server-Side Code
To complete the upload started by Image Uploader, some actions
on the server side should be performed. The upload script of this application is almost equivalent to
one of the Basic Demo Sample. The only
difference is that now additional form data are sent along with images, and, therefore, additional POST
fields are parsed (in this case, only the Title field).
See Also
Reference
- Thumbnail Class
- FolderPaneHeight Property
- ShowButtons Property
- UploadFileCountChange Event
- UploadFileCount Property
- UploadFileGuid Property
- UploadFileRemove() Method
- Guid Property
- ParentControlName Property
- UploadFileDescription Property
- AddField() Method