Adding Authentication
Many web-sites contain sensitive information and only authorized users have access to it. Authentication and authorization mechanisms aim at organizing access control. Access is usually controlled by insisting on an authentication procedure which allows to establish the user identity and, then, grant those privileges as may be authorized to that identity. User name and password are usually used as identification credentials. If specified user name/password pair is valid, the person is considered to be an authenticated user and, after that, the site logic determines resources the user can access.
This article describes authentication mechanisms that you can use along with Image Uploader:
- basic and digest authentication
- integrated Windows authentication (NTLM)
- custom cookie-based authentication
- URL-based authentication
Moreover, Image Uploader supports HTTPS connections.
Image Uploader behaves differently in Internet Explorer and other browsers. From authentication point of view the main difference is that Image Uploader is not integrated with non-Internet Explorer browsers, which means that Image Uploader opens connection sockets "manually" and sends files and other data independently from a non-Internet Explorer browser, although it can get additional data and cookies through HTML and JavaScript beforehand. Moreover, Image Uploader cannot use most security settings of non-Internet Explorer browsers as well as authentication mechanism used on a page which hosts Image Uploader. Contrarily, if Image Uploader is launched in Internet Explorer, it uses HTTP communication layer of this browser to upload files. Thus, the transfer is performed the same way as by Internet Explorer, and Image Uploader uses the same HTTP settings as a web page hosting it.
Hence, you need to perform some additional steps to implement authentication for non-Internet Explorer browsers. See paragraphs below for detailed information on how this difference affects certain authentication types.
Basic and Digest Authentication
Basic and digest authentication are widely used in the Internet because they are supported by most browsers and can be easily implemented. The main difference between these authentication mechanisms lies in the fact that basic authentication sends the user name and password over the network as a plain text, whereas digest authentication hashes user credentials using MD5 algorithm. Both authentication schemes do not require any server-side scripting support. To use any of them you just need to set up your web server (refer to your web server documentation for instructions). Image Uploader automatically determines what type of authentication (basic or digest) your site uses.
If your site is secured using basic or digest authentication the following login dialog will pop up in non-Internet Explorer browsers before the upload, even if the user is already logged in:
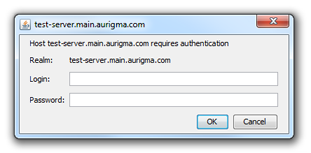
To customize this dialog you may use the AuthenticationDialog class, for more information, please, see the Customizing Appearance topic.
Integrated Windows Authentication (NTLM)
Integrated Windows Authentication (also known as Windows NT Challenge/Response or NTLM authentication) directly uses Windows NT user accounts. It hashes the user name and password before transmitting them across the network. Like basic and digest authentication, this scheme does not require any server-side scripting support. For instructions on configuring your web server, refer to its documentation.
Image Uploader supports NTLM authentication only in Internet Explorer. If you choose NTLM authentication for your site, users will not access it via non-Internet Explorer browsers (Firefox, Safari, and etc).
Custom Cookie-Based Authentication
This scheme requires additional support in server-side scripts. What exactly you will have to do depends on your web server, scripting language, and frameworks you use. However, generally you will need to:
- Provide some storage for user credentials.
- Create a login form to check user names and passwords and set cookies.
- Add validation to your server scripts whether the user is identified.
- Send authentication and session cookies along with uploading files (in non-Internet Explorer browsers only).
For more information about the last step, please, see the maintaining sessions and authentication topic.
URL-Based Authentication
In general, this mechanism is similar to the previous one, but in this case all the information required for user identification is passed through the URL, not via cookies.
To put it differently, you need to specify a special URL in the UploadSettings.ActionUrl property, like
UploadScriptName?id=ldmvqinmsodjuhfqajmduj, to send the user identity. Then the server-side upload script will analyze the id
request variable and apply corresponding permissions level.