Using Quality Meter
ActiveX/Java Uploader is commonly used for ordering digital photo prints through the web. Usually printing companies allow ordering photo prints in different print formats (e.g. 4 x 6 inches, 5 x 7 inches, etc). The larger the print format is selected, the larger image dimensions should be to get the acceptable quality. However, users (especially inexperienced ones) often do not have an idea what dimensions the image has and whether it can be printed in some format with the good enough quality. To indicate which formats can be used for printing certain images, ActiveX/Java Uploader allows displaying a so-called quality meter.
ActiveX/Java Uploader Express disables quality meter functionality. See the Upload Suite Editions topic for details.
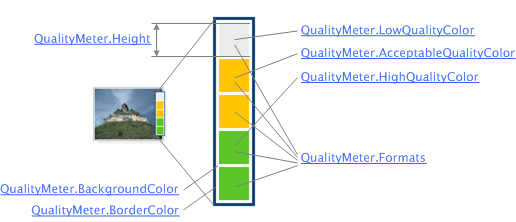
The quality meter is represented with several color rectangles (see the figure below). Each rectangle corresponds to one print format. There are three color values: for formats that can be printed with high quality; for formats that can be printed with the acceptable quality, but with a lower resolution; and for formats that are too large for this image (the quality of the printed image in this format will be too low). On this screenshot the "good" formats are green, the acceptable formats are yellow, and the "bad" formats are grey.
To turn the quality meter on you should configure a QualityMeter object and pass it to the PaneItem.QualityMeter property.
The mandatory property is Formats. If it is not set or have an incorrect value, the quality meter will not be displayed. Each format is represented with four values separated by a comma: name, maximum format size (in pixels), minimum format size (in pixels), and acceptable format ratio. The formats are separated by a semicolon. Here is an example:
<aur:Uploader ID="Uploader1" runat="server">
    <PaneItem>
        <QualityMeter Formats="4x6 inches,1800,1200,1.2;6x8 inches,2400,1800,1.3" />
    </PaneItem>
</aur:Uploader>
$uploader = new Uploader("Uploader1");
$uploader->getPaneItem()->getQualityMeter()->setFormats("4x6 inches,1800,1200,1.2;6x8 inches,2400,1800,1.3");
$uploader->render();
var u = $au.uploader({
    id: 'Uploader1',
    paneItem: {
        qualityMeter: {
            formats: '4x6 inches,1800,1200,1.2;6x8 inches,2400,1800,1.3'
        }
    }
});
u.writeHtml();
This string describes two formats: 4 x 6 inches and
6 x 8 inches (assuming that we print with the resolution that is equal to 300 DPI).
Let us review a quad describing the print format in more details. We will take
4 x 6
	 inches
format as an example:
- The name is
4 x 6 inches. It will be displayed as a tooltip when the mouse pointer hovers over this quality meter element. - The maximum format size in pixels is
1800. For the landscape orientation this will be the width, for the portrait orientation this will be the height. It is calculated in the following way: we simply multiply the number of required inches by the resolution your printer can handle. In our case it is6 inches * 300 DPI = 1800 pixels. - The minimum format size in pixels is
1200. It is defined by analogy with the maximum format size: for the landscape orientation it will be the height, for the portrait orientation it will be the width. It is calculated in the similar way:4 inches * 300 DPI = 1200 pixels. - The acceptable format ratio (further AR) is
1.2. This parameter is required when the image dimensions are less than the values specified with two previous parameters (print format dimensions). The AR is used to determine if the image can be printed with the acceptable quality or not. It works in the following way: we get a ratio between the print format dimension and the image dimension, and if this ratio is lesser than the AR, quality is acceptable, otherwise, printing in this format is not recommended. For instance, for an image of size1600 x 1066calculations will be the following:1800/1600 = 1.125(the same is for height). The AR is1.2. It means that we can mark this image as acceptable. If we take a1024 x 768image, we will find out that1800/1024 = 1.7578125and it is more than the AR. Thus, such an image should be marked as too small.
If the print format is good for the image, the appropriate quality meter element is filled with the color specified by the HighQualityColor property. Acceptable print formats are filled with AcceptableQualityColor. Non-recommended print formats are defined by the LowQualityColor property. You can also change the color of the border (the BorderColor property) and the background (the BackgroundColor property). The screenshot above demonstrates these settings.
When customizing your quality meter, you may also specify its height using the Height property. ActiveX/Java Uploader will not let the quality meter overlay other controls, if you provide too large value for this property, so your layout will not be spoilt.
You may wonder why AR can be different for each format. The point is that the larger image you print, the less resolution you may use. It is related to the fact that larger prints are mostly used to be viewed at a long distance (e.g. they are hung on the wall) whereas small pictures are viewed at a short distance (e.g. in a photo album). When someone looks at the picture at a distance, they usually do not notice small details, and, therefore, there is no need to print the image with the same high resolution as smaller pictures.
This enables you to increase the AR for larger formats. For instance, if for 4 x 6
inches format this it is 1.2 (in other words, the image can be 20% smaller than
required and in this case it will be printed with 240 DPI instead of 300), for 20 x 30
inches you can freely set the AR = 1.5 (i.e. if the image will be 50% smaller than
necessary, you still can print it with 150 DPI).
All AR values in this article are approximate. You should select your own AR for each format according to capabilities of your printing machine and the quality standards accepted in your company.
Finally, let us see a simple code sample that defines a quality meter for the following formats:
4 x 6"5 x 7"8 x 10"16 x 20"20 x 30"
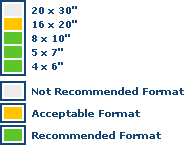
You can also display a legend so that users could easily understand in what formats they can order their prints, but you will have to write HTML code for the legend yourself. The result may look similar to the picture below.
| Format | Acceptable DPI | Recommended DPI | Acceptable Dimensions | Recommended Dimensions | Acceptable Ratio |
|---|---|---|---|---|---|
4 x 6" |
200 | 300 | 1200 x 800 | 1800 x 1200 | 1.5 |
5 x 7" |
200 | 300 | 1400 x 1000 | 2100 x 1500 | 1.5 |
8 x 10" |
200 | 300 | 2000 x 1600 | 3000 x 2400 | 1.5 |
16 x 20" |
100 | 200 | 2000 x 1600 | 4000 x 3200 | 2 |
20 x 30" |
100 | 200 | 3000 x 2000 | 6000 x 4000 | 2 |
<aur:Uploader ID="Uploader1" runat="server">
    <PaneItem>
        <QualityMeter Formats="4 x 6,1800,1200,1.5;5 x 7,2100,1500,1.5;
            8 x 10,3000,2400,1.5;16 x 20,4000,3200,2;30 x 20,6000,4000,2" />
    </PaneItem>
</aur:Uploader>
$uploader = new Uploader("Uploader1");
$uploader->getPaneItem()->getQualityMeter()->setFormats("4 x 6,1800,1200,1.5;5 x 7,2100,1500,1.5;
    8 x 10,3000,2400,1.5;16 x 20,4000,3200,2;30 x 20,6000,4000,2");
$uploader->render();
var u = $au.uploader({
    id: 'Uploader1',
    paneItem: {
        qualityMeter: {
            formats: '4 x 6,1800,1200,1.5;5 x 7,2100,1500,1.5;' +
                '8 x 10,3000,2400,1.5;16 x 20,4000,3200,2;30 x 20,6000,4000,2'
        }
    }
});
u.writeHtml();