Inserting Image Uploader ASP.NET Control into ASP.NET Page
Image Uploader ASP.NET control is an ASP.NET server control intended to make deployment of Image Uploader, configuring it, and handling uploaded data easier. It allows ASP.NET developers to utilize Image Uploader in a straight-forward way just as the other ASP.NET server controls and provides the following advantages over a standard way of deployment (this way is described in the Inserting Image Uploader into Web Page topic):
- Easy to insert Image Uploader into ASP.NET Web Form. You just drag and drop the control onto your page in Visual Studio designer, and it automatically generates client-side code and deploys Image Uploader-related files.
- Ability to configure Image Uploader in Visual Studio using Properties editor.
- Simplification of server upload script. The control gets data sent from the client in POST request, parses it, and provides typed access to this data server-side.
Let us examine Image Uploader ASP.NET control usage by the example of a simple image gallery. Suppose the gallery requires a user to upload downsized copy of image along with a source one. To perform this task we can phase it as follows.
Adding Control to the Page
To add Image Uploader ASP.NET control into the gallery page just walk through the following steps:
-
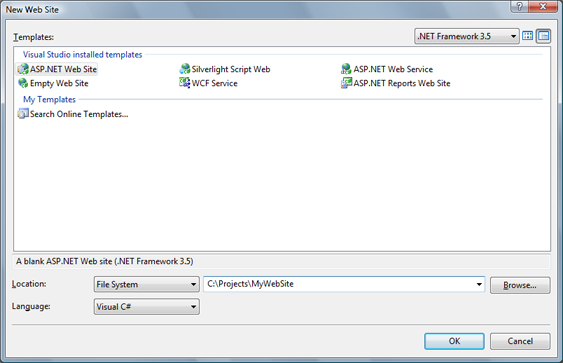
Create new ASP.NET web site (in Visual Studio 2008 menu File -> New -> Web Site...).
-
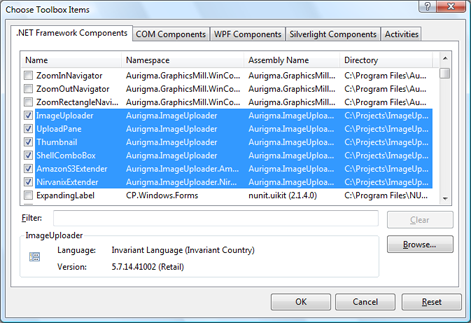
Add Image Uploader ASP.NET control to the toolbox:
- Right-click on the tab of toolbox where you want to add this control and select Choose Items....
- Find the ImageUploader in the .NET Framework Components tab.
- If you cannot find this component, click Browse... and find the Aurigma.ImageUploader.dll assembly. This DLL can be found in Image Uploader installation folder (typically this is C:\Program Files\Aurigma\Image Uploader 6.5 Dual).
- Click OK on both Open and Choose Toolbox Items dialogs.
-
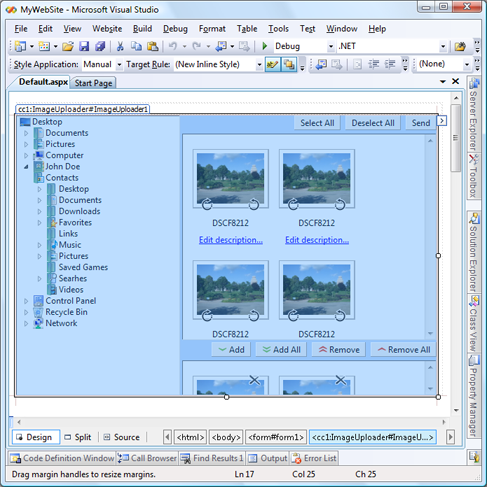
Open the page where Image Uploader should be placed in the design mode, then drag and drop the ImageUploader item into the desired position.
Configuring the Control
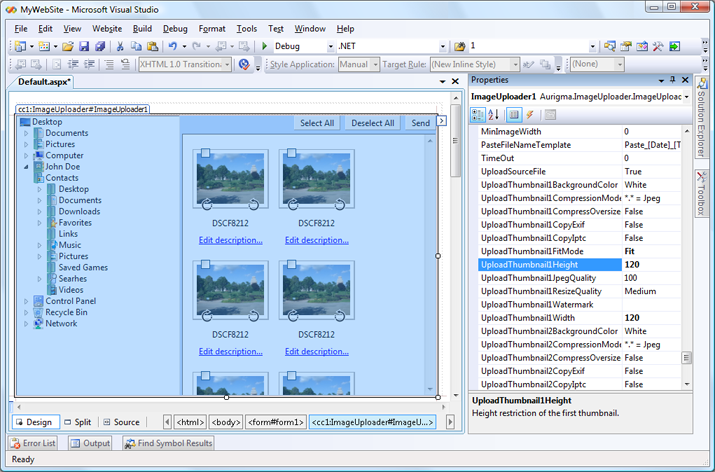
There are two ways to configure Image Uploader. The first one is to use the list of control properties in Properties editor. Each of these properties is coupled with a short description, however, if you need more detailed information see Image Uploader ASP.NET Control Reference for it.
The second way is to modify Image Uploader ASP.NET control properties in the source of an ASP.NET page declaratively. See the source code of the main page of our gallery (default.aspx) below.
<%@ Page Language="C#" AutoEventWireup="true"  CodeFile="Default.aspx.cs" Inherits="_Default" %>
<%@ Register assembly="Aurigma.ImageUploader" namespace="Aurigma.ImageUploader" tagprefix="cc1" %>

<!DOCTYPE html PUBLIC "-//W3C//DTD XHTML 1.0 Transitional//EN" "http://www.w3.org/TR/xhtml1/DTD/xhtml1-transitional.dtd">
<html xmlns="http://www.w3.org/1999/xhtml">
<head runat="server">
    <title>Image Uploader ASP.NET Control Sample</title>
</head>

<body>
    <form id="form1" runat="server" >
        <cc1:ImageUploader ID="ImageUploader1" runat="server"
            Height="400" Width="600"
            Action="Default.aspx"
            RedirectUrl="Gallery.aspx"
            UploadThumbnail1FitMode="Fit"
            UploadThumbnail1Width="120"
            UploadThumbnail1Height="120"
            OnFileUploaded="FileUploaded" />
    </form>
</body>
</html>
On this page we have set mandatory parameters, such as Image Uploader identifier and its dimensions, as well as optional parameters required by our image gallery. Here we have specified an event handler which will process uploaded files and a page to which the user will be redirected when the upload successfully completes, set TwoPanes layout as this view is more convenient for the image gallery, and configure one thumbnail for upload. This thumbnail will be created for each image right before upload and will be fitted to 120x120 pixels.
Handling Upload
Image Uploader ASP.NET control provides special FileUploaded event to handle uploaded data server-side (the code snippet above demonstrates how it can be specified). This event is fired the same amount of times as a number of files uploaded from the client receiving the data related to a particular file. Here is a source file, thumbnails created for this file client-side, original file name, description and so on. All this data is passed to the event via parameter of FileUploadEventArgs type.
The gallery stores source images and its thumbnails in /Gallery and /Gallery/Thumbnails folders respectively, as it is demonstrated in default.aspx.cs source code below.
public partial class _Default : System.Web.UI.Page
{
    protected void Page_Load(object sender, System.EventArgs e)
    {

    }

    protected void FileUploaded(object sender, Aurigma.ImageUploader.FileUploadEventArgs e)
    {
        string galleryPath = "Gallery/";
        string thumbnailsPath = galleryPath + "Thumbnails/";

        Aurigma.ImageUploader.SourceFileInfo sourceFile = e.SourceFile;
        Aurigma.ImageUploader.ThumbnailInfo thumbnail = e.Thumbnails[1];

        string safeFileName = sourceFile.GetSafeFileName(Server.MapPath(galleryPath));

        sourceFile.Save(Server.MapPath(galleryPath + safeFileName));
        thumbnail.Save(Server.MapPath(thumbnailsPath + safeFileName));
    }
}
It solves our task in the following way:
- Retrieve the source image and its thumbnail using FileUploadEventArgs.SourceFile and FileUploadEventArgs.Thumbnails properties.
- Generate unique filename to avoid a name conflict. To do it we use the GetSafeFileName(String).
- Save the source image and the thumbnail in required folders using a unique filename obtained on the previous step.
Displaying Uploaded Files
On the configuring step we specified the RedirectUrl
property to the "gallery.aspx" value. It means that Image Uploader
will redirect users to this page after the upload successfully completes. So, it would be convenient to display uploaded files
here. To implement this functionality we iterate through all the previews stored in the
/Gallery/Thumbnails folder and display each thumbnail as a link to its original image
(source images are stored in the /Gallery folder). See the source code below.
gallery.aspx:
<%@ Page Language="C#" AutoEventWireup="true" CodeFile="Gallery.aspx.cs" Inherits="Gallery" %>

<!DOCTYPE html PUBLIC "-//W3C//DTD XHTML 1.0 Transitional//EN" "http://www.w3.org/TR/xhtml1/DTD/xhtml1-transitional.dtd">
<html xmlns="http://www.w3.org/1999/xhtml">
<head runat="server">
    <title>Gallery</title>
</head>
<body>
    <asp:DataList ID="DataList1" Width="100%" RepeatLayout="Table" RepeatDirection="Vertical"
        RepeatColumns="4" runat="server">
        <HeaderTemplate></HeaderTemplate>
        <ItemTemplate>
            <a href="<%# galleryPath + System.IO.Path.GetFileName(Container.DataItem.ToString()) %>" target="_blank">
                <img src="<%# thumbnailsPath + System.IO.Path.GetFileName(Container.DataItem.ToString()) %>" />
            </a>
        </ItemTemplate>
        <FooterTemplate></FooterTemplate>
    </asp:DataList>
</body>
</html>
gallery.aspx.cs:
public partial class Gallery : System.Web.UI.Page
{
    protected string galleryPath;
    protected string thumbnailsPath;

    protected void Page_Load(object sender, System.EventArgs e)
    {
        galleryPath = "Gallery/";
        thumbnailsPath = galleryPath + "Thumbnails/";
        DataList1.DataSource = System.IO.Directory.GetFiles(Server.MapPath(thumbnailsPath));
        DataList1.DataBind();
    }
}
You may run the image gallery application considered in this article on your server. To do it, just paste source code to default.aspx, default.aspx.cs, gallery.aspx, and gallery.aspx.cs files to your server using the following folder structure:
bin
	Aurigma.ImageUploader.dll
Gallery
	Thumbnails
default.aspx
default.aspx.cs
gallery.aspx
gallery.aspx.cs
Make sure that /Gallery and /Gallery/Thumbnails folders have enough permissions to save files to:
- On Windows NT/2000/XP you should grant the modify permission to the Internet guest user (IUSR_<machinename>).
- On Windows 2003 Server you should grant the modify permission to the NETWORK SERVICE group.
- On Windows Vista and 2008 Server you should grant the modify permission to the account your site application pool is running under, Network Service by default.