Getting started with ASP.NET WebForms
Upload Suite consists of ready-to-use client applications based on major technologies, so it works with the most important platforms (Windows, Mac, Linux) and in all modern browsers (IE, Mozilla, Safari, Google Chrome).
To start you have to choose an uploader: Java/ActiveX that for more advanced projects or HTML5/Flash for lightweight ones. The exact technology will be chosen automatically depending on the user’s browser. Also you should configure the uploader and, perhaps, write server code (however Uploader Suite can resolve specific tasks without a single line of server code).
Let’s consider how to add Aurigma’s HTML5/Flash Uploader to your web application which will upload and save files to a specific folder. You can also use Java/ActiveX Uploader in the same manner.
- Download and install the free trial from Aurigma’s website.
- Add HTML5/Flash Uploader ASP.NET to the toolbox in Visual Studio:
- Right-click on the tab of toolbox where you want to add the control and select Choose Items.
- Find the ImageUploaderFlash in the .NET Framework Components tab.
- If the tab does not contain this component, click Browse and find the Aurigma.ImageUploaderFlash.dll assembly in the Upload Suite installation folder (typically in C:\Program Files\Aurigma\Upload Suite [version number]\HTML5-Flash\).
- Click OK on both the Open and Choose Toolbox Items dialogs.
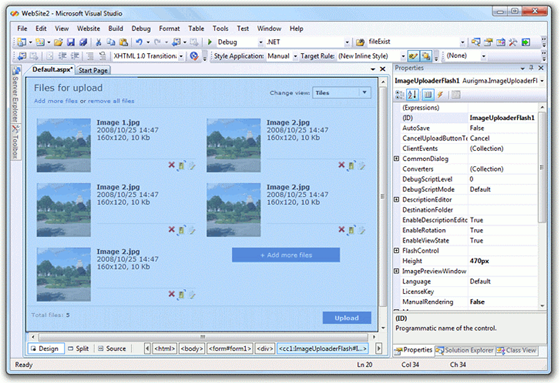
- Open the page where HTML5/Flash Uploader should be placed in the design mode of your application, then drag and drop the ImageUploaderFlash item into the desired position.

- Set this page as a start page: right-click the page in Solution Explorer and select the Set As Start Page menu option.
We’ve now added the client-side uploader to the application. Now let’s configure the uploader. We can perform this in two ways. The first is to use the list of control properties in the Properties editor:

The second way is to modify ImageUploaderFlash properties in the ASP.NET page source code:
<%@ Page Language="C#" AutoEventWireup="true"
          CodeFile="Default.aspx.cs" Inherits="_Default" %>
<%@ Register assembly="Aurigma.ImageUploaderFlash"
             namespace="Aurigma.ImageUploaderFlash"
             tagprefix="aur" %>

<!DOCTYPE html PUBLIC "-//W3C//DTD XHTML 1.0 Transitional//EN"
          "http://www.w3.org/TR/xhtml1/DTD/xhtml1-transitional.dtd">
<html>
<head runat="server">
    <title>ASP.NET Control Sample</title>
</head>
<body>
    <form id="form1" runat="server">
        <aur:ImageUploaderFlash ID="Uploader1" runat="server"
                LicenseKey="XXXXX-XXXXX-XXXXX-XXXXX-XXXXX-XXXXXX">
                AutoSave="true"
                DestinationFolder="~/Catalog"
         <Converters>
       <aur:Converter Mode="*.*=SourceFile" />
      </Converters>
        </aur:ImageUploaderFlash>
    </form>
</body>
</html>
As you may have noticed, the HTML5/Flash Uploader, like any ASP.NET control, embeds in a form tag and has id and runat parameters. Let’s discuss other properties that have been used:
- LicenseKey specifies a trial or full license key. You can go without it on the localhost only.
- AutoSave tells the uploader to automatically save uploaded files to the folder specified with the DestinationFolder property (the Catalog folder in our sample).
- Converters configures how to process files before the upload. Each Converter specifies what will be uploaded for each user-selected file: the original file as is, a thumbnail created from the original image file, an icon associated with the original file, or the original file compressed into a ZIP archive.
That's all! As we noted above, Uploader Suite can upload and save files without a single line of server code. If you run the application, you’ll see a simple upload interface (if your browser supports HTML5, it will use the HTML5 control, and Flash otherwise):

Uploader Suite allows you to configure the uploader to be very flexible, customize the look-and-feel by changing CSS or precompiled SWF themes, and extend its functionality using JavaScript events, etc. If you would like to learn more, you can examine the documentation or contact our support team.