Using Photo Kiosk Configuration Tool
Configuration Tool is additional software distributed along with Photo Kiosk and intended to change Photo Kiosk settings, customize its appearance, configure price and print parameters. You can run Configuration Tool from the Start menu->Programs->Aurigma->Photo Kiosk 7.0.
In Configuration Tool you can browse settings using the navigation tree on the left. After you have selected a section in the tree, the settings available in this section will appear on the right.
After you have changed Photo Kiosk configuration, click the Apply button to save changes and continue work with Configuration Tool or the OK button to save changes and close Configuration Tool. Clicking the Cancel button discards all unsaved changes and closes Configuration Tool.
After you have finished configuring, do not forget to restart Photo Kiosk to apply new changes.
Here is the brief overview of the sections available in the Configuration Tool navigation tree:
Behavior section allows to configure Photo Kiosk common behavior and includes the following subsections:
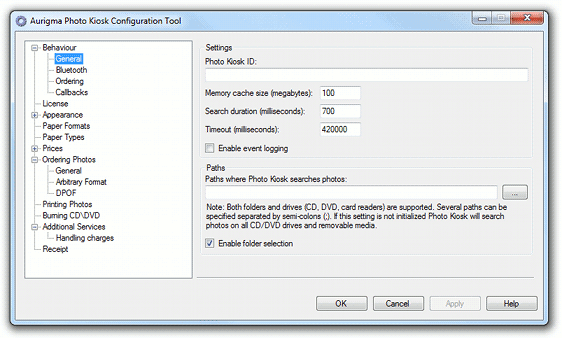
- General includes some common settings, like ID of the current Photo Kiosk instance, memory cache, search duration and timeout, and paths to source media (see the Configuring Digital Media topic).
- Bluetooth allows you to set uploading photos via Bluetooth; see the Configuring Digital Media topic.
- Ordering contains requirements for customer contact information and allows to disable image editing options (rotation, flip, color correction, etc.)
- Callbacks allow specifying applications, that will be launched on different order states, namely, start, complete, and cancel.
- License contains an activation key; you should specify your license key here. For more information see the Evaluating and Registering topic.
- Appearance contains General subsection, where you can specify Photo Kiosk theme and path to localization file, and a subsection for each Photo Kiosk screen allowing to set header and background images. For more information see the User Interface section.
- Paper Formats contains list of all paper formats (name, width, height, and DPI for each format) and allows adding new formats; see the Configuring Photo Paper Formats and Types topic.
- Paper Types contains list of all paper types (name and description for each type) and allows adding new types; see the Configuring Photo Paper Formats and Types topic.
- Prices allows you to set minimum total order price (an order cannot be placed if its total price is less then this amount) and sales tax. Here is a subsection for each paper format/type pair that allows setting one photo print price and volume pricing. For more information see the Pricing and Discounts topic.
Ordering Photos is about orders handling; it is described in the Orders Management topic. The section includes the following subsections:
- General here you can enable exporting orders to DPOF (format used by minilabs), converting photos to JPEG, and storage cleanup settings.
- Arbitrary Format defines how to export orders to file system or shared network storage.
- DPOF sets storage for orders exported to DPOF and assigns a print channel to each paper format/type pair.
- Printing Photos allows enabling and configuring photo printing; for more information see the Printing Photos topic.
- Burning CD/DVD allows enabling and configuring burning CDs/DVDs; for more information see the Burning CDs/DVDs topic.
- Additional Services allows to add/delete different services, like copying photos to USB, creating photo album, or adding handling charges to an order price; each subsection contains service settings; for more information see the Additional Services topic.
- Receipt allows enabling receipts and configuring its template; for more information see the Printing Receipts topic.